Showing posts with label DIY. Show all posts

March 15, 2011

DIY No. 08 - Baby Travel Kit

Baby shower, check!  Super cute gift, double check!  Check it out below.  Very proud of this one.  :-)

Card
paper stitched fabric banner

Travel Changing Pad
padded with oil cloth interior and button closure
tutorial:  prudent baby

Travel Baby Wipes (small)
padded with ribbon accent - for the diaper bag
tutorial: according to kelly

Travel Baby Wipes (large)
padded with ribbon accent - for the car

Travel Zippy Pouch
ribbon zipper pull, polka dot interior
tutorial: flossie teacakes


And the finished product...

February 13, 2011

DIY No. 07 - valentines for him


don't you love when a project comes out just how you envisioned?  :-)  the chip board gives a nice masculine/rustic texture and the red interior peeking through a cut out heart is just enough "i love you" to keep your man from blushing.  overall clear, concise and super understated...which i think makes it all the more romantic :-)

February 11, 2011

DIY No. 06 - valentines for her


these little darlings were made by stitching fabric hearts to white cardstock. inspired by a bright idea, these valentines are simple with just the right amount of girly.

January 30, 2011

DIY No. 05 - Pillows


Today I checked off one of my New Year's resolutions and learned how to sew!  (Thanks for the lesson g'ma!)  Yes, these pillows were a very very basic sewing project, but hey, you gotta start somewhere!  While in the O.C., I picked up this fabric from the $3 bin (score!) and had a hunch it would go perfectly with our flor!

More sewing adventures to come I'm certain....

DIY No. 04 - Puppy Poinsettias


I know this is a little late, but I just wanted to share a little doggie-DIY project I did for Christmas...

Fact, when my extended family gets together for holidays, we are out numbered by dogs.  This year I took inspiration from pup's christmas collar and made all the dogs felt poinsettias that attach to their collars with a little elastic band.  The felt is super soft and didn't seem to bother them one bit (unlike the jingle bell collars some of the dogs where shamed to wear last year, very unfortunate).  The packaging was super easy - a ziplock bag with a 2" strip of scrap book paper folded to conceal the opening, hole punched and tied with twine.  easy, cheap, and super adorable.  Great way to get the dogs "dressed" for the holidays!  Leave a comment or email me if you would like the template I created to make these.

p.s.  Lots of possibilities to take this idea into other seasons... what about a sunflower or daisies for that 4th of july party this summer?

December 29, 2010

bright idea: map bangle

vintage map bangle by danielle west

recently i've been interested in all the different forms "paper" takes and patterns (see DIY wrapping paper and snowflakes).  maps present interesting patterns on paper and it has got me thinking about different ways to create map-art.  enter the map bangle!  what a cute little DIY project, the step by step instructions can be found here.  the hardest part is deciding what city map to use....

December 14, 2010

coming soon: DIY gift wrap


DIY gift wrap for my Eames-Themed Christmas.  Step by Step still to come...

December 6, 2010

DIY No. 02 - Magnets


I've been toying with the idea of doing this since my earlier post... and when I have "craft" on the brain its hard for me to stop thinking about it until I actually do it!  Getting the images is really the hardest part - q&e from there!

Lets get started...

What You'll Need:  (clockwise from the top left)
- an image (you can print one from your computer or cut photos, magazines, etc.)
- clear glue (E-600 is great for glass and magnets)
- pen
- large glass spheres (in the candles/vases aisle of the craft store.  be sure to look for the large 1" ones)
- scissors
- 3/4" round magnets

Off The Shelf Cost:  $20
My Cost: $11 (darn $6 glue!)


1.  size and print image.  place glass sphere on top of image and trace.  cut out image.
tip:  photo paper or card stock recommended. 

2.  place a pea-sized dab of glue on the image.  press down the glass sphere, eliminating air bubbles.   let dry.
tip: place something heavy (ie edge of a book, etc) on top of the sphere to maintain pressure

3.  place a dab of glue on the magnet at secure to the back of the image.  maintain pressure with something heavy.  let dry.  stick it on the fridge or in a cute tin.
tip:  tins made for gift cards fit 6 magnets nicely - michael's sells them for $1 at the register

4.  wrap it up and give it as a gift
tip:  if you use a tin, the magnets will not slide and rattle around


*thanks to kerry for being my guinea pig on this DIY & congrats to M for popping the question to such a lovely girl.  the "real" magnets are still to come ... i just couldn't bring myself to post spoilers before christmas!  ;-)


December 3, 2010

Fav's - Best DIY Wreaths

Inspired by my last post on my favorite DIY advent calendars, I decided to continue with the theme and do a little round up of my favorite DIY wreaths.  Here we go....

eco-friendly...
 
recycled greeting card wreath by good housekeeping

raggedy...
fabric wreath by a beautiful mess

spicy...
cinnamon wreath by the food network

fluffy...
marshmellow wreath by the food network

feathery...
feather wreath formally by anthropologie 
(why do they not carry this anymore?!)
girly...
 doily wreath by martha stewart 

woody...
pinecone wreath by martha stewart
 ruffly...
felt wreath by domestifluff


December 2, 2010

Fav's - Best DIY Advent Calendars

In the holiday spirit, here is a little collection of my most favorite DIY advent calendars....

just for kids...
muffin tin with magnetic covers (genius!) by keepsakes by kristi

fun & simple...
 felt stockings by rikrak

oh so adorable....
notes on a spool by just something i made

sophisticated....
paper cones by the red thread

 eames era....
retro advent calendar by sweet petunia

November 22, 2010

DIY No. 01 - Christmas Dog Collars


The Holidays are just around the corner and every pup should feel festive!  This is a q&e (quick & easy) craft that took me less than an hour ... including the walk to and from the fabric store!  enjoy! -k


Let's get started....


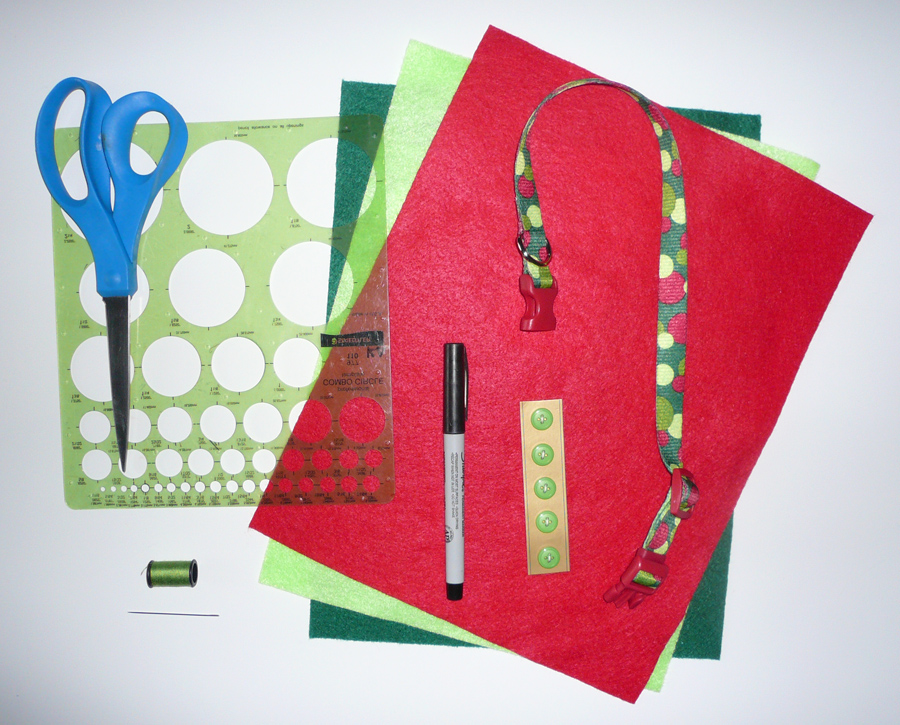
What You'll Need:  (clockwise from the top left)
- scissors
- circle template (or something circular to trace - cups, coins, etc)
- felt (you can find colored squares of it in a fabric store for about 20 cents each)
- dog collar (from the pet store, or make your own!)
- buttons
- pen
- thread
- needle

Off The Shelf Cost:  $18
My Cost: $8 (darn $7 dog collar!)


Time to Craft!.... 


1.  Cut out felt circles of various sizes.  Snip "V" shapes around the edge with scissors to create petal shapes.  Also cut out leaf shapes.
tip:  for the leaf, make the end that will show pointy and leave the other end square so there is more surface area to sew

2.  Layer your felt shapes and place on dog collar.  Cut 4 pieces of thread and thread them all through the needle (this creates a stronger stitch).  Tie a knot at the end of the thread.  Sew on the flower starting from the back of the collar.
tip:  you can also sew the flower to a loop of elastic if you don't want it permanently attached to the collar.  simply slip the collar through the elastic loop.

3.  Repeat with different sized flowers, leaves or other shapes until top-cuteness is achieved.

4.  Add dog.


{{{visions of sugar plums....}}}